Before you start
You need:- A computer running macOS, Windows, or Linux
- A Discord account — create a Discord account if you don’t have one
- A Claude subscription — Pro (20 USD/month) or Max (100 USD/month) at Claude. Pro works fine to start. Not required if self-hosting — see self-hosted models to run with a local model instead
ollim-bot is a single-user bot designed to run as a personal assistant
in Discord DMs. No server is required.
Open a terminal
You’ll paste commands into a terminal throughout this guide. Open one now:- macOS
- Windows
- Linux
Press Cmd + Space, type Terminal, and press Enter.
Install Git and uv
ollim-bot needs two tools: Git (downloads code) and uv
(manages Python, the language the bot is written in).After uv installs, close your terminal so your PATH updates.
The next step is in the browser, so you won’t need it yet.
Install Git
- macOS
- Windows
- Linux
Git is pre-installed on macOS. Verify by pasting this and pressing Enter:You should see something like
git version 2.39.0. If you see
“command not found”, download Git from
git-scm.com, run the installer, then
run git --version again to confirm.Install uv
- Linux / macOS
- Windows
Create a Discord bot
Open the Discord Developer Portal
in your browser and click New Application. Give it any name
(e.g. “ollim-bot”).

Install to your Discord account
Click Installation in the left sidebar.Under Installation Contexts, check User Install and uncheck
Guild Install. Verify the install link dropdown is set to
Discord Provided Link (the default for new apps). Under
Default Install Settings, verify that 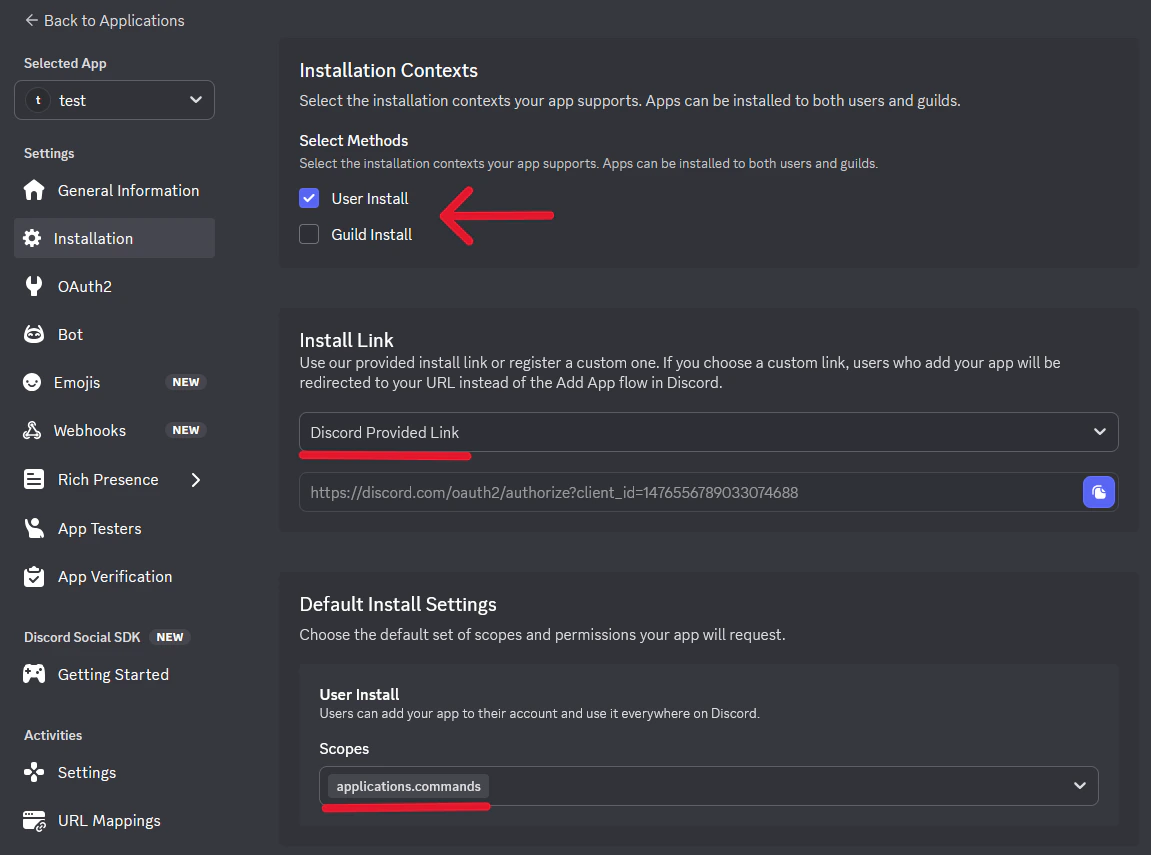

applications.commands
is listed in the scopes — Discord adds it by default. If either
is missing, set them manually. Then click Save Changes at the
bottom.Download and install ollim-bot
Verify uv is working:You should see a version number like Move into the downloaded folder:Install the bot:This also installs
You should see a list of commands starting with
uv 0.6.0. If you see
“command not found”, close the terminal, open a new one, and run
uv --version again. If it still fails, see
troubleshooting.Download the bot’s code:claude-history, a
tool that lets the bot search past conversations so it can remember
things.Verify the bot installed:ollim-bot -- ADHD-friendly Discord assistant. If you see “command
not found”, see troubleshooting.Configure the bot
Create the configuration file:Open the file in a text editor:This opens the file in TextEdit.Find these three lines and fill in the values:
- Linux / macOS
- Windows
- macOS
- Windows
- Linux
.env
- Replace
paste-your-bot-token-herewith the token you copied in step 2 - Replace
YourFirstNamewith your name (the bot will call you this) - Replace
Ollimwith whatever you want to call the bot
Using a local model instead of Claude? Add
ANTHROPIC_BASE_URL, ANTHROPIC_AUTH_TOKEN, ANTHROPIC_MODEL, and ANTHROPIC_SMALL_FAST_MODEL to your .env as well — see the self-hosted models section for values. You can skip the sign-in step in step 6.Start the bot
In the same terminal, start the bot:If you’re using a Claude subscription, the bot sends you a Discord
DM with a sign-in link on first launch. Open the link and log in
with your Anthropic account.Once ready, the bot sends you a startup DM in Discord.
If you configured a local model provider
or set
ANTHROPIC_AUTH_TOKEN in your .env, no sign-in link
appears — the bot connects directly to your inference server.Run first-time setup
The bot’s startup DM includes a “Get started — 3 questions”
button. Click it to walk through guided setup — the bot asks your
name, its personality, and context about your work and schedule.At the end, setup offers to create a morning check-in routine
that messages you every weekday at 9 AM with your schedule and
priorities. If you accept, the bot writes the routine file
immediately — no extra steps needed.Setup also checks your Google integration status and points you to
the next step if it’s not connected yet. See
Google integration for the
full walkthrough.Once setup is done (or skipped), try a message to see the bot in
action:
Remind me to take out the trash tomorrow at 10am, and follow up if I haven’t done it by noonThe bot creates a reminder and a follow-up chain — at noon it checks whether you’ve confirmed, and only pings you if the task is still outstanding.
After setting up Google integration, try: “What’s on my calendar today?”
CLI commands
Beyond running the bot,ollim-bot provides commands for managing
routines, reminders, and Google services. Run these in your terminal:
Troubleshooting
"Private application cannot have a default authorization link"
"Private application cannot have a default authorization link"
Bot not responding to DMs
Bot not responding to DMs
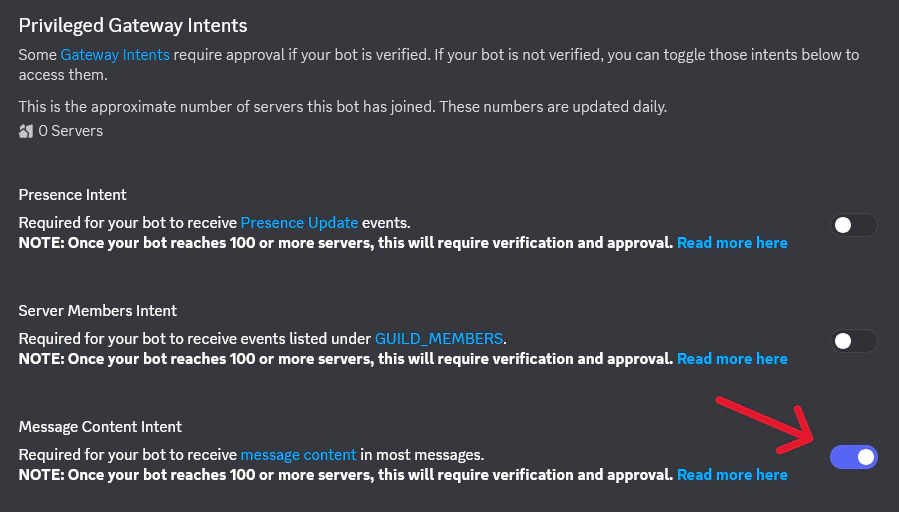
Verify that Message Content Intent is enabled under Bot >
Privileged Gateway Intents. Without it, the bot connects but cannot
read your messages.
Slash commands not appearing
Slash commands not appearing
Slash commands sync on startup. If they don’t appear:
- Confirm you installed via User Install (not Guild Install) — slash commands in DMs require user installation
- Wait a few minutes — Discord caches command lists and may take time to update
- Restart Discord (Ctrl+R on desktop) to force a cache refresh
Next steps
Set up Google integration
Connect Google Tasks, Calendar, and Gmail to the bot.
How ollim-bot works
Understand the agent loop, sessions, and fork model.
Conversations
Learn how DM conversations, context, and streaming work.
Set up your first routine
Morning briefings, task reviews, and proactive check-ins — the feature that makes the difference.